Wednesday, November 10, 2010

Classic White Bean Soup


Ah yes, the mercury is dropping, perhaps you've broken out the hats and gloves, and for most of us, the sun has long disappeared by the time we return home from the office. We're slowly eating less fresh berries, salads, white wine and fish, and are now craving steak, baked potatoes, red wine and roasted lamb - or maybe that's just me. If there is one signal my stomach gives me that the cold weather has officially arrived, it is my sudden craving for the most classic of cold-weather food - soup!

Now I wasn't much of a fan of soup growing up. Whenever I would hear we were having soup for dinner, my aching, growling stomach would let out a small groan of disappointment with the anticipation of the bowl of hot water and vegetables that was about to hit it. It wasn't so much that the soup wasn't any good, it was more the lack of satiation I would feel eating bowl after bowl.

How I've changed my mind! I've since realized you can get so much more out of your soup! It's more than just boiled vegetables floating in hot water - it can be rich, creamy, full of complex flavors while remaining simple, and most importantly, it can fill you up as good as a steak and baked potato any day.

Nothing fits this bill more than a classic white bean soup. Rich in soluble fiber, iron and protein, white beans add such a richness to soup that you won't miss the meat. They also provide a real creaminess to the broth that one would be hard convinced no dairy was added. Nothing but minimal, simple ingredients in this soup, but it tastes like so much more!

What you will need (serves 2):

1 cup dry white beans (Navy or Great White Northern work fine)
1/3 cup Extra Virgin Olive Oil
2 large carrots
2 sticks of leafy celery
1 large ripe tomato, grated
1 tsp sea salt
1/2 tsp fresh pepper
Peeled skin (with the rind) of half an orange

Soak the dry beans overnight, or as long as you can before you plan to cook - the longer you soak them, the faster they'll cook. Bring the soaked beans to a boil and simmer for 5-10 minutes then drain and set aside. Pre-boiling the beans is key in that it helps take some of that pesky 'air' out of the beans, if you get my drift. Next, heat the olive oil in a large pot. Adding the carrots and celery, sauté for a couple minutes, then add the grated tomato and cook for about 5 minutes. Now add the beans, salt, pepper and orange peel - the secret ingredient, detrimental to the flavor of the soup - and it works best to just add it in one big piece. Last, add the water depending on how thick you like your soup. I usually add enough water to come up about 2 inches above the beans and keep an eye on it as it boils. Cover and simmer for about 40-50 minutes, until the beans are soft.

Tuesday, August 10, 2010

Choosing Your Olive Oil


One of the most common questions I receive from a someone curious about olive oil is, "How do I know how to choose a good olive oil?" In light of an article posted in the Huffington Post this week: Olive Oil 'Virginity' Questioned in California Lawsuit, I would like to give a little advice on what you should be looking for when you find yourself caught in bewilderment in the Olive Oil isle at your local supermarket.

First let's talk Italian oil. If the bottle says it's a product of Italy or that it is produced or packaged in Italy, it means just that - the oil was literally filled into the bottle in a factory in Italy. Now where that oil actually came from is another story. Because Italy is the top player in the Olive Oil market, meaning, most people recognize Italy as being known for producing olive oil above any other country, they are required to put out massive amounts of production, right? The problem is, Italy cannot possibly grow the amount of olives on their own soil to produce the amount of oil needed for export. So what do they do? They buy oil from Spain, Tunisia, Morocco and other surrounding countries that can offer them a large quantity of bulk oil for a good price, and unfortunately, that often means lower quality. So that fine bottle of Italian oil you have sitting in your kitchen? Yes, it's a pretty good bet it's actually a cheap oil from Spain.

Another good indicator of a high quality oil is the price. Again referring mostly to Italy, if the price is too good to be true, it probably is. Now, that's not to say there aren't some great reasonably priced oils out there, you just have to know what you're looking for. I'm sorry to be picking on the Italians so much, as they do produce some of the most astounding oils in the world, unfortunately you just have to pay for it.

For a more affordable high-quality Extra Virgin Olive Oil, look to Greece. Yes I know, I do love Greece, that is true, but because the Greeks dedicate 60% of their cultivated land to growing olives, they actually produce most of their own oil, and because Italians have been savvy for years in selling delicious food products, the Greeks tended to just sell their good oil to the Italians only to be labeled as 'Product of Italy'. Well now the Greeks are trying to get into the market themselves and show-off their local golden nectar. So next time you find yourself looking at a Greek oil in the supermarket, chances are, it is actually a real Greek oil. This could be true for many other countries that don't have the massive production demands that Italy has. So all I'm saying is, watch out for those Italian oils.

Another way to know that the oil in your bottle is produced where it says, is by looking for the PDO certification on the label. This stands for Protected Designation of Origin which is a European certification that the oil in the bottle does in fact come from the specific region it states. Other versions of this certification are PDI or Protected Geographical Indication, DOP or Denominazione di Origine Protetta and AOC or Appellation d'Origine Contrôlée. These certifications are becoming more common on products exported to the USA so you should keep an eye out for them.

Great news is that in October the US Department of Agriculture will be implementing new standards for labeling olive oils more comprable to the International Olive Oil Council, which has been setting the standards for olive oil in Europe for years. Hopefully this will make it a little easier on us all next time we're faced with that great wall of olive oil at the local grocery.

Monday, July 19, 2010

Cretan Dakos


Rusks, hard dry breads made from barley and whole wheat, have been an essential part of the Cretan diet for many years. Lauded for its high fiber content, the locals praise its digestive qualities and have perfected the art of baking these delicious breads. If you are lucky and have access to a store that sells these rusks, as many specialty Mediterranean food stores do, be sure to look for ones with a high barley content as the whole wheat rusks are less hard and will become soggy quite quickly. Look for the brand 'To Mavva' (pronounced 'Toe Mahnah') with the green labeling (the blue labeled ones are whole wheat) as I considered these to be the best barley rusks from Crete.

What you will need:

Barley Rusks*
Sea Salt
Extra Virgin Olive Oil
Grated Ripe Tomatoes
Goat Cheese (Feta, Myzithra, or Soft Goat Cheese)
Oregano
Kalamata Olives

Depending on the size of the rusks, use as many as your hunger requires. Take the barley rusks and run them under tap water until the whole rusk is wet (a few seconds will do). Do not skip this step - they are VERY hard and will break your teeth if you don't! However, if you are using a whole wheat rusk, or bread you have dried out on your own at home, skip this step to avoid ending up with a plate of mush. Once the bread is wet, generously sprinkle the bread on all sides with sea salt, place on a serving dish, then pour your finest, freshest Extra Virgin Olive Oil over the bread. If you have a Greek Koroneiki variety, use it! The flavor of the oil really shines in this dish.

Next, grate the tomato (one medium-sized ripe tomato per piece of bread) and pour on top of the bread, then take the goat cheese and crumble as much as you like on top. Take a pinch of dried oregano and sprinkle over the cheese and place a few kalamata olives on top. Now take your bottle of olive oil once again and drizzle some more over the entire dish for a final touch. Serve right away.

The outcome should be bread that is not too hard nor too soggy - think 'softly crunchy'. By the time you serve the dish, the combined flavors of the oil and tomato should have soaked into the bread and be absolutely delicious!

* If you cannot find barley rusks, wheat rusks are ok too, just do not wet them with water before you cover with the oil and tomato. You can also dry out thick pieces of whole wheat bread at home in your oven on low heat.

Saturday, July 10, 2010

Shrimp Pasta (it's all about the sauce!)


Ever wondered how a gourmet Italian restaurant creates that perfectly light tomato sauce that you can never seem to recreate at home? Well I did, and the secret is as simple as having a quality bottle of Extra Virgin Olive Oil and a juicy ripe tomato. Never buy that thick, sugary, canned pasta sauce again! Impress your friends with your own home made sauce - and they never have to know how effortless it really is!

Here is what you'll need for a meal for two:

Pasta noodles - I prefer a long noodle like Spaghetti or Fettucini
Extra Virgin Olive Oil
1 medium-sized clove of garlic, chopped
Fresh or frozen, cooked or uncooked shrimp - as many as your heart delights
2-3 Tbsp white wine
1 large ripe tomato
Pinch of sugar
Salt
Fresh cracked pepper
Parmesan cheese

First, get your water boiling for the pasta. Cook the noodles 1 minute less than al-dente according to the directions on the package. I find you can cook the sauce in the amount of time it takes to boil the water and cook the noodles, so get them going first. In the meantime, work on your sauce.

Heat enough olive oil on medium heat to coat the bottom of your skillet (you'll want to use a skillet that's large enough to hold all the pasta when it's ready). Add the chopped garlic and let sizzle for a minute, careful not to let it brown. Next, add the shrimp. Sauté until pink if uncooked, or if cooked, sauté until warmed, then add the white wine and turn up the heat just a tad to a slight boil. While the shrimp is cooking in the wine, grate your tomato and stir in with the shrimp. Sprinkle a pinch of sugar then add as much salt and pepper to your liking and continue to let the sauce thicken until noodles are ready.

Once the noodles are cooked, drain and add them to the skillet to stir in with the sauce. The idea is to let the noodles cook in the sauce for another minute or two so they soak up all that tastiness, but be careful not to overcook - you still want them al-dente, unless of course you prefer your noodles soggy.

When the pasta is all ready, the final touches are up to you. You can add some grated parmesan cheese and more fresh cracked pepper, and if you're a true olive oil lover, lightly drizzle your finest over the top just before serving.

On a side note, sliced Kalamata olives, artichoke hearts and crumbled feta cheese (in which case you would omit the parmesan) added to your sauce just before stirring in the cooked noodles, make a great hearty addition.

Wednesday, July 7, 2010

Cucumber Water


Now I know this has absolutely nothing to do with olive oil, but it does have to do with my second favorite natural consumable liquid: Water! Being that summer is now in full-force, I just wanted to share what I have been drinking by the gallon to keep hydrated. Just slice up a small cucumber, drop the slices into your favorite pitcher, and fill it up with some cool filtered water. I sometimes even add a sprig of fresh basil as the two flavors complement each other well. I find drinking cucumber water to be extra refreshing than plain 'ol water after a long afternoon in the sun. The best thing is that you can continually refill the pitcher with cool water using the same cucumbers and toss them out at the end of the day.

More olive oil recipes coming very soon!

Thursday, May 13, 2010

Greek Boureki


With summer just around the corner comes an abundance of fresh zucchini from the garden. So instead of sending your kids stumbling down the street, arms overflowing with your garden's bounty to give away to the neighbors (sorry, childhood memory...), here is one baked dish that you won't mind eating once a week and as always, is simple to prepare and a pleasure to devour!

What you'll need:

3 medium potatoes
3 small zucchini
1/4 cup fresh mint, chopped
1/2 teaspoon dried oregano
1 large ripe tomato, grated (see former blog regarding tomato grating)
1/3 cup Extra Virgin Olive Oil
1/2 cup water
salt & pepper
1 package plain goat cheese (6 oz.)

Begin by peeling the potatoes and slicing them into rounds about 1/8 inch thick and sprinkle with sea salt to let rest a couple minutes. Slice the zucchini in the same manner and thickness. Place sliced potatoes and zucchini in a large bowl, then add the chopped mint, grated tomato, olive oil, water, and a bit more salt and pepper to taste. Combine the ingredients with your hands - it's the best way to mix! Pour mixture into a 9x13 baking dish and crumble the goat cheese over the top. Place in the oven and bake uncovered at 425° for 50 minutes or until the cheese begins to turn a golden brown.

Wednesday, March 31, 2010

Tuna Salad Deluxe

tuna salad

Having been raised in the Midwestern United States, canned tuna was pretty much a staple growing up, from tuna melts to tuna hotdish, while my favorite being the tuna salad sandwich - a can of tuna, a little mayo, and a spoon full of dill relish stuffed between two slices of bread. Classic. Over the years my love for canned tuna has never waned, and to this day I enjoy experimenting with the multiple ways this delicious can of fish can be used in the kitchen.

If anyone asks what simple culinary delight I gravitate towards most while enjoying a quiet night alone at home, it would be the tuna salad. For some reason it just never gets old. Over the years of trying out different variations, mainly sweet vs. savory, I've discovered what I now call my 'Classic Tuna Salad', the one I prepare literally twice a week. It's by far my best savory salad, with a little bit of a kick and can also makes a great melt.

Fish loves olive oil, olive oil loves fish and the more the better! When making a proper tuna salad I always mix some directly in with the tuna mixture for moisture, thus needing less mayo, then pour more over the entire salad when finished. Oh, and did you know they make mayonnaise with olive oil now? Good stuff. Keep an eye out for it next time you need to restock the mayo.

For the tuna mixture:

1 can tuna in water
1 tsp. mustard powder (this provides the kick)
1 tbsp. mayo
1/2 tbsp. olive oil
squeeze of fresh lemon
dash of salt and cracked pepper

Mix the ingredients above in a bowl so all the flavors blend with the tuna, then add the follwing:

2 chopped dill pickles or one heaping spoonful of dill relish
4 finely chopped almond-stuffed green olives (or add slivered almonds)
1/3 cup chopped fennel (don't leave this out, it really is the secret of the salad!)

After all of the above ingredients are mixed together, scoop it out over your favorite veggies - I prefer mine Greek-style with fresh tomatoes, cucumbers and sliced green or red pepper, sprinkled with a little sea salt. Then pour your Extra Virgin Olive Oil over the entire salad, drizzle a little white wine vinegar, and (for those of you who live in Crete) throw in a couple of small barley rusks.

Thursday, March 18, 2010

Letting go of your fear of fat...


As you may have realized by now, I am a huge advocate of eradicating the old notion that fat makes you fat. I know it seems so logical, where immediately upon ingesting the stuff that it would quickly attach itself to your most glorious bodily regions. Well, I am here to dispel the myth and consider myself living proof of the fact. I eat fat with the fullest of pleasure - no lean meats for me! Don't take that skin off my chicken! Pork belly? Bring it on! What do you mean 'drizzle' a teaspoon of olive oil on my salad? Give me the bottle!

Let's face it, fat has suffered a bum rap over the years. What we have forgotten however, is that is in fact a nutrient, one that keeps your hair shiny, your skin soft, and your belly full - saving you from those multiple trips to the kitchen. Now I'm not advocating all fats are great, but I do feel that the industrialization and manipulation of our foods over the years has caused us great damage. I truly believe that fats from natural sources - meats, fish, dairy and fruit oils (olive oil!) - are not as scary as we have been lead to believe, and that certainly not all fats are created equal. As I've said before, I don't know where that liter of olive oil goes that I consume in a week, but it doesn't appear to be going to my thighs.

As I was searching around online to see if anyone else shared my views, I happened upon a wonderful fat-advocating article from the Weston A. Price Foundation, a non-profit organization who believes in "restoring nutrient-dense foods to the American diet through education, research and activism." The foundation strives to continue the research of Weston A. Price, a nutritional researcher who supported the scientific validation of traditional diets by studying the foods and health of isolated non-industrialized peoples around the world. I highly recommend clicking here to read "Taking the Fear Out of Eating Fat" - their quest to restore some dignity to our friendly nutrient.

*photo courtesy of "The Onion"

Monday, March 15, 2010

Eggplant Parmesan

eggplant parmesan

I'm really not sure what to call this, as it really is just a medley of vegetables - eggplant, zucchini, and potatoes with Parmesan cheese. I enjoy this dish year-round and especially when eggplant is in season - I love the little 'Spanish/European' eggplants that are similar in size to the zucchini and try to buy them when I can. I also find this dish to be a more satisfying vegetarian meal and as always, quite simple to prepare.

First I'd like to reiterate how I determine my portions for ingredients. When I am in my kitchen at home I generally aim to cook a generous meal for 2 people as I like having a little bit of leftovers. I do find however, that most of these recipes can be easily modified and that it's not necessary to follow the portions with precision. I'm one of those people to tends to eyeball things - rarely measuring or timing anything, unless it comes to baking of course, so I encourage you to freestyle with your portions as well.

What you'll need:

3 zucchini
3 Spanish/European eggplant (or one regular eggplant)
3 medium potatoes
1 large ripe tomato
Whole Parmesan Cheese
Extra Virgin Olive Oil
Salt, Pepper

Heat about 1/4 cup of olive oil in a deep pot on the stove. Quarter the potatoes and add to the olive oil. Quarter the zucchini and eggplant and add to the pot. You want to be sure that all the veggies are in larger pieces so they do not fall apart when cooking. Grate the tomato (as seen in previous blog) and add to the pot along with the salt and pepper to your taste. I like to salt my veggies after they are cut and let them sit for a minute allowing the salt to soak in.

When you have everything in the pot, add a good cup of water and cover. When it comes to a boil, turn it down to simmer until potatoes are cooked - about 25 to 30 minutes depending on what type of potato you're using. Do check on it once or twice while it's simmering to see if you need to add a little more water. The trick with this dish is getting the liquid just right since the zucchini and eggplant will release more water as they cook, so just keep it in mind.

After the veggies are cooked, cut up some Parmesan cheese into 1 inch cubes and add them to the pot. You want the cheese to be melted just slightly, but remain intact.

It's now ready to serve - be sure to have some bread on the table to soak up all the extra sauce on your plate!

Tuesday, March 9, 2010

Olive Oil Myths

This is a link to a blog written by Australian olive oil taster and blender, Richard Gawel titled "The All-Time Top 10 Myths Surrounding Extra Virgin Olive Oil". It addresses many of the common misconceptions associated with olive oil from first cold pressing, to its low smoking point, to storing your oil in the refrigerator: http://www.aromadictionary.com/EVOO_blog/?p=263

Saturday, March 6, 2010

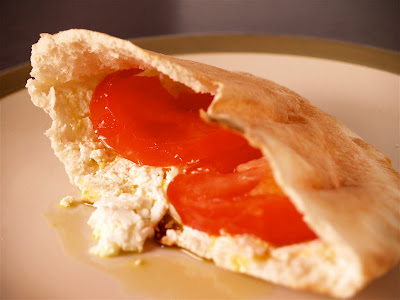
Goat Cheese Tomato Pita

goat cheese tomato pita

Basically this post is just an excuse to play around with improving my food photography skills. I realize that the photos of my food up until this point have looked only minimally appetizing, so here's my attempt to step it up a notch with the new 'high quality' lights and tripod I just ordered.

After all the hours of playing around with my new toys, flashing pictures of bowls of fruit and pretty much anything I could get my hands on from the kitchen, I naturally developed a mid-afternoon snack attack. I then did what I do nearly every day when this happens - I opened the fridge and prepared one of my trusty staples, the goat cheese and tomato pita, dripping with olive oil. So why not use this hungry opportunity to test my equipment for real and post it on my blog? It's simple and tasty enough!

Here's all you need:

Half a pita bread
Plain goat cheese (feta also works well)
Sliced Tomato
Salt
Olive Oil

Toast the pita bread, then open and spread the inside with a good tablespoon of the goat cheese. Place a couple thinly sliced pieces of tomato inside, sprinkle with salt, then pour as much olive oil inside as you desire. I like mine to be pretty drippy - It's just no fun if the oil isn't running down your hands, but that's just me.

Sunday, February 28, 2010

Chicken with Okra in the Oven

chicken with okra in the oven

Finally, a meat dish! While olive oil is perhaps best-known for pouring over fresh veggies, it also does wonders in baked dishes. This is a simple, tasty meal that can be prepared in just a few minutes.

First let's talk chicken. After going through a recent period of avoiding chicken, likening most to watery rubber, (I'll have the steak please!), I soon discovered organic chicken. It's everything chicken was meant to be - juicy, tender and full of flavor. Also, I prefer dark meat with the skin left on: fat = flavor. If you're weary of fat, fine, but just think of all that flavor you'll be sacraficing! Bird skin is magic!

As for the okra, it can be difficult to find fresh, so checking your grocer's freezer is a good bet.

What you'll need:

Organic chicken thighs and drumsticks with skin
(I generally use about 1 thigh and 1 drumstick per person)
Potatoes, peeled and quartered lengthwise
(1 large potato per person)
Fresh or frozen okra
(about one cup per person)
2 medium ripe tomatoes for grating*
1/2 cup olive oil
1 tsp salt
pepper

*see 'Grating A Tomato' blog

First, grate the tomatoes into a baking dish. Add the olive oil, salt and pepper, and about 1 cup of water. Then place the chicken, potatoes and okra in the dish, spooning the tomato mixture over the ingredients. Bake at 425°F for one hour.

Thursday, February 25, 2010

Grating Tomatoes

"What? Grate a tomato?" Yes folks, throw out your gooey canned tomato paste and grab a big juicy tomato, we're about to make some fresh tomato sauce!

For years I wondered how those fine-dining restaurants could produce such a light, 'real tomato-tasting' sauce in some of their dishes. I tried everything from finely dicing them to tossing them in the blender. Then I moved to Greece and discovered their age-old tomato grating technique. I wondered how on earth this never caught on in the rest of the world and feel I must deliver this message to the masses! I now firmly believe that all red sauces should be made fresh, no excuses, because it's just too dang easy - no boiling or broiling necessary.

To start, select the ripest tomato from the bunch as you want to extract as much juice as possible from the fruit. Next, slice the tomato in half and press the open side of one half against the wide-toothed side of a cheese grater, beginning to grate the tomato with a plate or dish underneath to catch the juice. As you can see from the pictures, all you are left with is the juice from the tomato in your dish, and the entire skin in your hand to toss out. Simple as that.

how to grate a tomato

Add a little olive oil, salt and pepper, and this can be used as a base in anything from pasta to chicken to toasted bread!

Friday, February 19, 2010

Simple Cabbage Salad

cabbage salad

I'm sure you have read by now about the super-food qualities of the cabbage. Not only is cabbage a great source of fiber, protein, beta-carotene, iron, potassium and vitamis B1, B6, and C, but it is also high in antioxidants, which protect against heart disease and cancer. The health benefits go on and on, but what it comes down to is that nothing beats the way this veggie tastes sprinkled with a little salt and drenched in the finest olive oil!

Cabbage is considered a winter vegetable and back before the Greeks had their greenhouses to supply them with juicy tomatoes and crisp cucumbers all year long, the cabbage salad was winter's answer to summer's Horiatiki, or Greek, salad. To this day, the Greeks still eat very seasonally, so when the temperature and leaves begin to drop, this is the salad you'll find on nearly every taverna table.

Cabbage Salad

1 firm head of white/green cabbage
2 carrots
Olive Oil
White Balsamic Vinegar
Sea Salt

With the cabbage salad, it's all about how you cut the cabbage. So to begin, be sure to select a firm, good looking cabbage from your grocer. Peel and discard the first outer layers and rinse the cabbage under water. Next, cut the cabbage in half vertically from top to base so you have two equal-looking halves. Leave one half out to chop and store the other in the fridge to use down the road when you get the cabbage craving. Now this is essential - using a good sharp knife, begin to slice strips as thin as possible. Again, be sure to cut vertically so that the top of your knife is at the top of the cabbage and the bottom of your knife is at the base. Slicing cabbage this thin does take some patience, but trust me, it will not taste the same if you cut it too thick. When finished, place sliced cabbage in a bowl.

Next, peel two medium-sized carrots. I like to use a carrot peeler to first discard the outer layer of the carrot, then continue to peel the carrots, using the same peeler, into the bowl with the cabbage.

Finally, pour your favorite olive oil* all over the salad, then sprinkle the white balsamic vinegar and salt to taste. You can also try a fruit vinegar such as apple or pear, but never red balsamic, it's just too overpowering for this salad. Again, I like to use quite a bit of oil in this salad to have extra at the bottom for bread dipping. Also, don't fear the salt on this one - cabbage takes it well.

*Because cabbage has a sweet, mild flavor, I like to compliment this salad with an Arbequina varietal from Spain. This oil has a smooth, sweet taste with nodes of apple and tomato, with a mild peppery finish.

Tuesday, February 16, 2010

"Jamie At Home With Olive Oil"

Love it! I just stumbled upon this video on YouTube from a cooking show called 'Jamie at Home' and it made me smile. The person who posted it clearly found it amusing how often the chef, Jamie, uses his olive oil in his cooking and created a collage of clips to demonstrate this. Notice the heafty pouring action straight out of the bottle. Watch and be inspired...


Wednesday, February 10, 2010

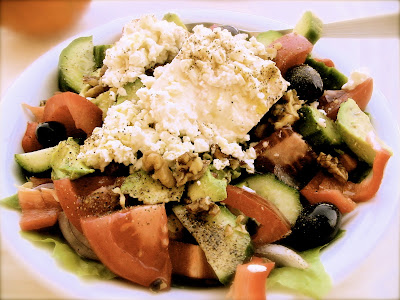
Traditional Greek Salad

greek salad

I'll never forget the first Greek salad I ordered, some years ago, sitting at a taverna under the shadow of the Acropolis in the Plaki neighborhood of Athens. "Why are all the vegetables literally floating in all this olive oil? And where's the lettuce? And do they really expect me to eat this entire two pound block of cheese on top?"

That was back when, like most Americans, I had a huge fear of fat. Fat makes you fat, right? Any recipe that ever called for olive oil always stated to neatly 'drizzle' a teaspoon of olive oil over your salad, safely keeping your daily fat intake below your allotted 60 grams.

Now here I was staring down at my dinner, needing scuba gear to fish out my cucumbers and tomatoes from a sea of what I saw as a substance waiting to attach itself to my thighs. But that was then and oh how I've changed! Now I won't get started on what I believe is a misconception of fats we've adopted in our culture - that's a topic for a whole other blog - but what I will say, is that I eventually had to get over this if I was ever going to live in a Mediterranean country that I soon realized consumes olive oil like water.

After returning from Greece to settle stateside, I've continued to consume olive oil in the same copious amounts as I did in Greece. I guess you could say I'm pretty much addicted to the stuff - not to mention a helpful 20 pounds lighter.

So with my first official recipe posting - the ever popular Greek salad - I would strongly encourage you to throw away your measuring spoons, pick up your favorite bottle of olive oil and pour!

Traditional Greek Salad

1 large English cucumber
2 medium sized tomatoes
1/2 green pepper
pitted Kalamata olives
Feta Cheese
sliced onion (optional)
dried oregano
sea salt

Ok, let's talk ingredients. When it comes to vegetables, you don't want to skimp on quality. I prefer English cucumbers or regular organic cucumbers to those waxy, water things they call a cucumber in most stores. English cucumbers are extra-long and firm and are the closest thing to what they use in Greece. I find most supermarkets sell these as well. Peel the cucumber and slice into rounds about a 1/2 inch thick and place in large glass bowl or plate.

As for the tomato, it can be quite difficult to find a good tomato outside of your own garden, especially in the winter, but it is essential to use a tasty tomato in this salad. Buy a couple different brands from your supermarket and see which one you like best and stick with it. Vine ripe tomatoes can also be a safe bet for flavor. Cut tomatoes in sections and sprinkle lightly with salt, then add on top of cucumbers.

Next, thinly slice the pepper in rounds and arrange on top of cucumbers and tomatoes. Sprinkle entire salad with the sea salt to your taste. I prefer Kalas Greek brand salt if you should happen to have a Greek market near you.

Oh cheese, how I love thee! When buying a good Feta, always look for one that is made from goat's milk as this is from what it is traditionally made. My favorite Greek brand of feta that is also sold in the US is Dodoni - if you can find it, get it. Now cut a huge chunk of the stuff - like half the size of a small paperback book - and place it on top of the salad.

Arrange the Kalamata olives around the salad, sprinkle a pinch of dried oregano on top of the cheese - and now pour your favorite olive oil* all over the salad until you have at least enough oil sitting on the bottom to dip some fresh baked bread into while you're eating.

On a side note, I'm not a huge fan of mixing my leafy greens with other veggies and prefer to keep them in separate salads. However, if you feel adventurous or have some other veggies you want to use up, throw in some red pepper, avocado and walnuts and turn it into a hearty meal (see photo).


*For this salad I use Trader Joe's brand Kalamata oil. This is a fantastic Koroneiki varietal from the region of Kalamata in the South Peloponnese of Greece - and usually just under $8 a liter at Trader Joe's - a super value if you ask me!

Welcome to 'Cooking With Olive Oil'

As an avid connoisseur and passionate lover of fine olive oil, one of the questions I most often receive by those curious about the substance is, "My doctor/friend/family member/newspaper/health magazine suggested I incorporate more olive oil into my diet, so what's the best way to do this?"

Being a person who heartily consumes a liter of olive oil in under two weeks, I feel more than happy to offer suggestions on how to drink (no drizzling here!) this healthy elixir by incorporating it into every meal. Here I will post dishes that I feel everyone and anyone can easily prepare in their own kitchen. When I cook, I lean towards the use of minimal ingredients of the freshest quality. Simple Food prepared simply - with Extra Virgin Olive Oil taking center stage, of course!

Along with posting recipes, I will also throw in some fun info and facts about olive oil as well as various brands and varieties I like. Also, when I say olive oil, let's always assume I am referring to 'Extra Virgin' as this is really the best olive oil to use when preparing your dishes. If you have a regular old bottle of 'olive oil' on hand, save it for the baked dishes or better yet, for frying. Otherwise, always use Extra Virgin, especially when consuming raw - the best and healthiest way to eat olive oil! Just do a taste test between the two and you'll know what I mean.

For more information about olive oil in general such as the history, origins, properties, and health benefits, there is plenty available online, so I'll regularly be adding links I find helpful if you're looking to expand your knowledge of the fruit juice.